Designer of many tatting patterns. Simple method of beaded tatting. Flowers are my inspiration!

Thursday, 15 April 2010

Roses - completed


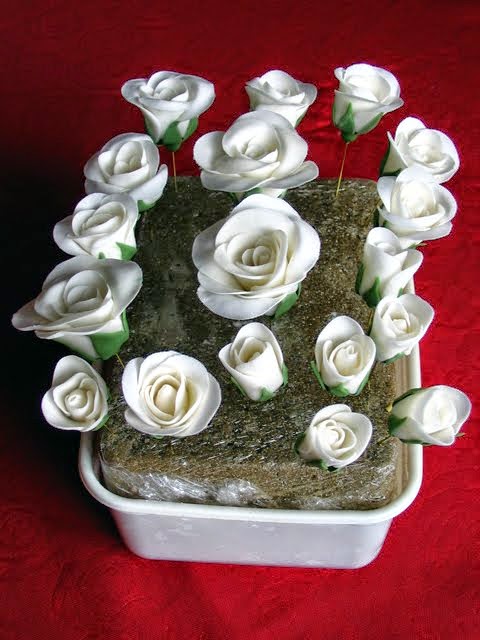
These are the three sizes of roses that I have decided on for my design of the cake. The only thing that I have to do to them is to dust them with shiny, ivory petal dust, but I won't do this until they are very dry and hard. Now then, back to the next 3 dozen roses! LOL.
I cannot do any more to the cake as it is far too soon. Although rich fruit cake keeps for years, the marzipan colour can leach into the icing if it is done too soon. I always use the natural marzipan instead of the yellow, which helps to minimise this leaching, but I won't take any chances!

Wednesday, 14 April 2010

Roses - next stage


In this picture I have put three different sizes of the roses, so that you can see how they develope. When I am happy with the size and shape......each rose seems to develope a character all of its own - rarely are two exactly the same.....I finish them off with a green calyx and seed pod. I will post a picture to show the finished flowers.

Tuesday, 13 April 2010

Wedding Cake Roses

I have not done any tatting for a while now for two main reasons.


One: I have had to travel long distances to see a professor about my back problem and:


Two: I am now in the throws of making my son's wedding cake flowers. The rich fruit cake is already made and maturing nicely. I made it with a half bottle of brandy in the mix, so it should be well matured by the time the wedding comes along in September!

Charlie's bouquet is going to be roses and so she wants roses on the cake.

I start with making a teardrop shaped bud on a wire (as you can see in the first picture). I made 6 dozen centre buds! I then add each petal individually. So far I have done 3 dozen with 4 petals each. Some will stay as tight buds, the others will grow into larger flowers the more petals I put on them, and also increasing the petal size.
I will post more pictures as they develope.

Tuesday, 30 March 2010

TattingChic's Blogaversary Giveaway

Just in case you haven't heard, Tattingchic is having a prize giveaway for her blog's second anniversay. Why don't you drop by and put in a comment, you could win a lovely prize?

Sunday, 28 March 2010

Bridal Headband

Here, as promised, is a picture of the completed bridal headband that is for my future daughter-in-law's maid of honour.
I have made it with exactly the same flowers, motifs, ribbons and pearl tatting as the bride's headdress, but with less in it, to distinguish between the two. Can't have the bridesmaid upstaging the bride, now can we? LOL

Friday, 26 March 2010

Rozella Linden Celtic Wreath

One of our collegues on HBT was having difficulty tatting the Celtic Wreath by Rozella Linden and so I decided to have a go myself.
I found that the first photograph did not correspond with the pattern given, i.e. there were less picots in the rings and more picots in the chains. What I did was to ignore the first photo and worked the pattern in conjunction with the second photo (the centre motif).


There is a slight error in the instructions to join the last ring to the first ring....3 ds have been omitted after the last join.


I made the mistake of trying to tat this with one shuttle and a ball thread....it needs to be done with two shuttles. When doing the first ring of the second round, the first join must be done from the back of the work. The second join must be done from the front and to achieve this you have to put both shuttles through the motif from the back, to the front. When you make the last join, you need to take the ring thread off your fingers and bring the loop through to the front and then put it back onto your fingers, to complete the ring. This then makes the chains automatically cross over one another.
You can see from my pictures that I didn't get the first two chains right!

Wednesday, 17 March 2010

Tatting Techniques DVD Progress


I have completed all the recording for the new Tatting Techniques video that I am doing...all I have to do now is to edit it, add music and record it to DVD....which as you can imagine, takes much longer than the actual tatting! LOL

This is a picture of the corsage that I have featured on the DVD whilst demonstrating different technques...such as clunies, wired clunies, wired pearl tatting and how to wire flowers.
There are lots of other techniques and tips as well, such as, starting without a knot, up joins, down joins, joins on the second half of a split ring, opening closed rings, beading, split rings, split chains, and probably more that I have forgotten to mention.

Tuesday, 9 March 2010

Tatting Techniques DVD

I am think of producing a Tatting Techniques DVD and would like to know your opinion. I aready have links to 4 videos that I have on YouTube, but I thought that I could produce a DVD that incorporated all of those plus other techniques, like hiding ends, starting without a knot, clunies, etc., etc..

Do you think that this is a good idea, or are there enough video demos out in tat-land? If you think it is a good idea, what else would you like to see demonstrated?

Sunday, 7 March 2010

Stiffening Products

Recently, a fellow tatter, (Gina) very genrously sent me a couple of stiffening products that she thought would help with my 3D projects.
She sent me two products, one a porcelain type that didn't really do the job, (too many problems), and one called "Perfect Sew".
The Perfect Sew was absolutely brilliant! It is a clear syruppy liquid, easy to use......just keep mopping up the stickly liquid that drains off.....and then it dries rock hard. It does not clog the picots at all and dries absolutely clear. I am very impressed indeed and will see if I can get a supply in the UK.
Thank you, Gina, for your tremendous generosity!

Tuesday, 2 March 2010

Pleasing outcome

My future DIL...for whom I made the bridal headdress and veil (nearly finished) is so thrilled that she has requested me to make a matching head band for her maid-of-honour.

I'm cock-a-hoop about this, because I like nothing better than a really good reason to make my 3D creations!

Will post a picture of the completed veil soon and then the new head band in the future.

Now must get the shuttles moving....busy, busy, busy! LOL

Sunday, 21 February 2010

Bridal progress so far


The headdress is now completed and I have used lots of the cluny designs that I have developed recently, together with other of my favourite own designs. Although it looks like a complete circle...it is not. It is open at the back, where the feathers come together on each side. This is where I shall be attaching the Juliette veil....not quite sure how yet, but I'm sure I'll work it out when the time comes!


I have decided to do the "hens and chicks" pattern, that is loved by many, to edge the wedding veil. I am using a size 2o thread with 3mm beads. Now, I know some of you will be thinking that this is rather thick thread for a delicate wedding veil, but in my many years of experience in making wedding veils with beaded tatted edgings, a very fine thread can only be seen when you are very close up to the bride, whereas a thicker thread really stands out from a distance. Also, I have found that thicker thread, together with lots and lots of beads, instead of weighing down the veil, makes it hang beautifully and has less tendencies to be as "fly away" in a breeze.

70th Birthday Card


Here is the card that I promised to blog about in the previous post.


I have also included a picture of the verses inside the card.

Saturday, 13 February 2010

Cards


Birthday cards are the order of the day today. My mother's 83rd birthday will be on Tuesday 16th February and I have made one to give from my husband and myself, and one to give from my son and his fiance.


I have one more to make for a friend, to give to a friend who will soon be 70. I have printed out the card and verse and made some of the flowers to decorate it with, but it's not quite finished yet. I will post a picture when it is completed.


Wednesday, 10 February 2010

Motifs completed so far

These are the motifs that I have completed so far, for future DIL's bridal headband. Sorry the picture is not of the best quality, but, as usual, I was in a hurry! LOL
Many more to do yet!

Monday, 8 February 2010

Headdress decision is made

For those who are following the saga of the bridal headdress for my future daughter-in-law, together we have come up with the final solution. She is going to have a full circle headress with a Juliette veil which drapes from the back.


The following picture is what she saw to make up her mind on the sort of thing she would like (but using the cluny rosettes and of course lots of other tatted motifs). We then developed it further into a full circle plus the little veil at the back to soften the shortness of her hair.


I have already made several motifs and wired them, plus some pearl tatting over wire (that will please Mark Myers), but there is still a lot more to do. I will post some pics as it developes.


I know she will look beautiful!